Using Matrox Image Library (MIL) for Windows
Matrox Imaging Library (MIL) is a comprehensive collection of software tools for developing machine vision, image analysis, and medical imaging applications. The toolkit features interactive software and programming functions for image capture, processing, analysis, annotation, display, and archiving. The following instructions describe how to configure Lucid Vision GigE cameras with Matrox Imaging Library for Windows.
System Specifications
- Windows 10 Pro 64-bit, version 1709, build 16299.64
- MIL 10.00 R2 (build 2995) 64-bit including MIL 10 Update 25 for GigE Vision
Prerequisites
-
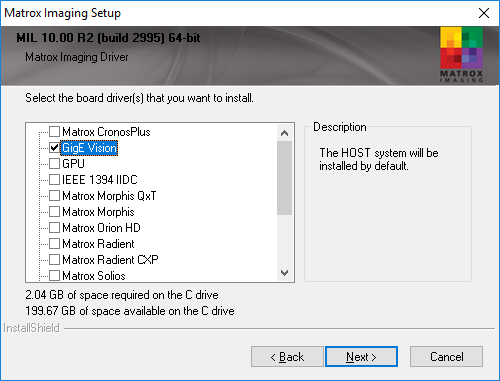
Install GigE Vision support at the time of MIL software installation.
-
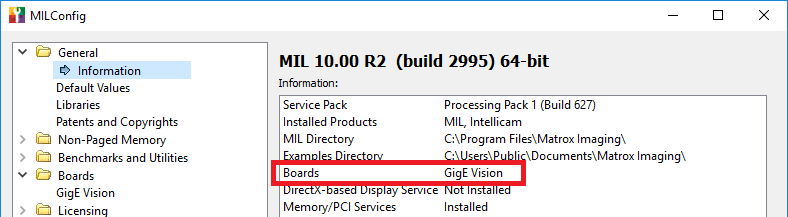
Verify GigE Vision support is installed by opening MilConfig and finding GigE Vision as an installed Board in General -> Information. MilConfig can be launched from the Start Menu.
Note
Installing MIL 10 Update 25 for GigE Vision is required for GigE Vision 2.0 support.
-
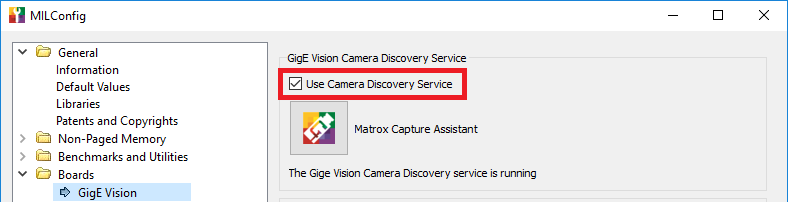
Verify the Matrox GigE Vision Discovery Service is running in Boards -> GigE Vision.
-
Ensure you have the Matrox GigE Vision Filter Driver installed. To install the Matrox GigE Vision filter driver:
-
Open Network and Sharing Center
-
Right-click on your Ethernet adapter and click Properties
-
Click Install in the Ethernet adapter’s properties window
-
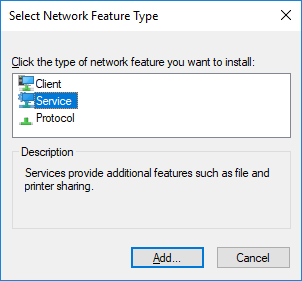
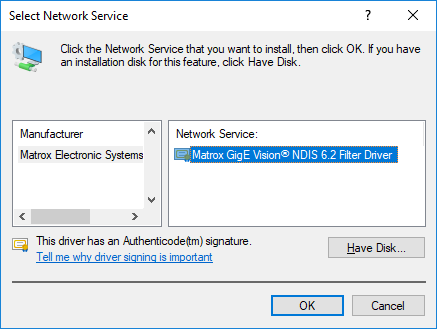
Choose Service in the Network Feature Type window
-
Find the Matrox GigE Vision Filter Driver in the Network Service window, and click OK to install the service.
Note:
If the Matrox GigE Vision Filter Driver is not available in the Network Service window, click Have Disk to find the filter driver manually. The filter driver is located in C:\Program Files\Matrox Imaging\Drivers\mtxgigefilter\sys.
-
Verify the Matrox GigE Vision Filter Driver is installed in the Ethernet adapter’s properties window.

-
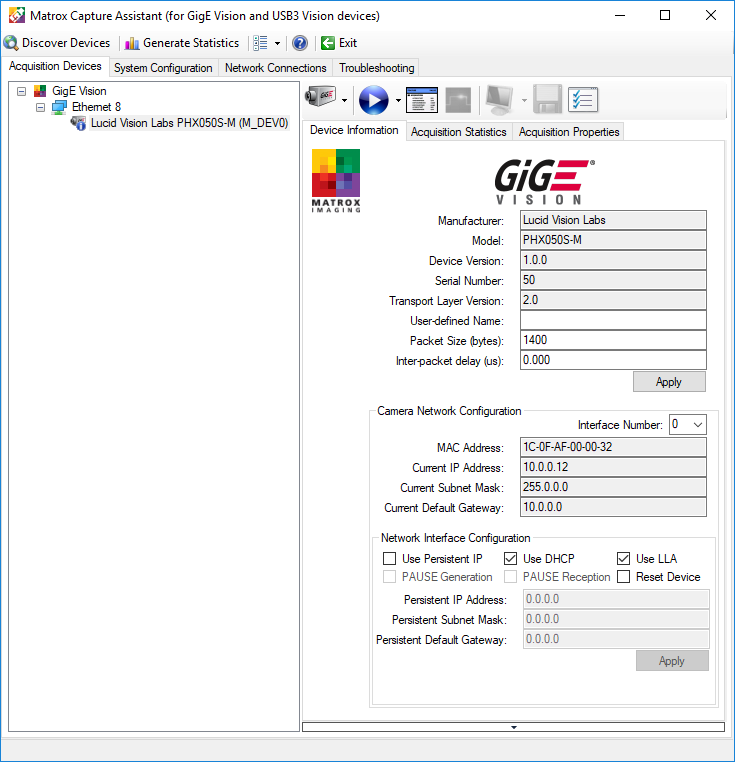
Matrox Capture Assistant
Matrox Capture Assistant is a utility that will allow you to quickly evaluate your camera from LUCID Vision Labs.
- Click
 to take or release control of the camera in Matrox Capture Assistant.
 - Click
 to start acquiring images.
 - Click
 to open the camera Feature Browser.
 - Click
 to toggle image display while acquiring images.
Matrox Intellicam
Matrox Intellicam is a program that enables frame grabber and image grabber configuration. You can also save customized camera settings to a digitizer configuration format file (DCF) in Intellicam for future use. Note while an Ethernet port is required to use a Lucid camera, a specific frame grabber is not necessary.
-
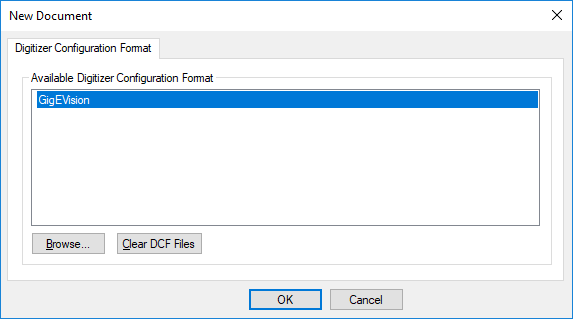
Ensure GigE Vision is chosen as your active system.

-
Click
 to start a new DCF.
 -
Choose a DCF file. The GigEVision DCF file is a default configuration that can be used as a starting point.
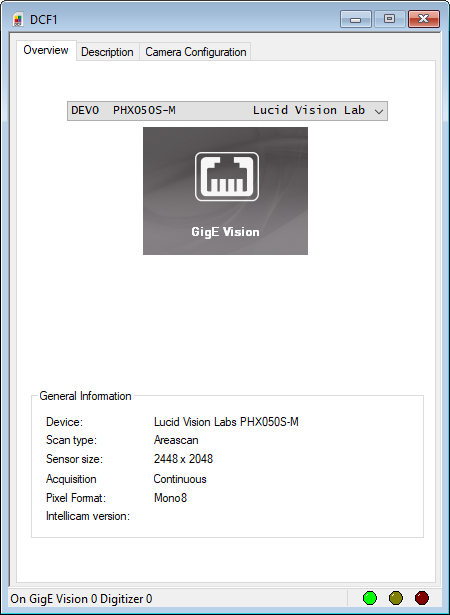
After choosing your DCF file, you will see the DCF configuration window.
- Click
 to grab a single image and display it on screen.
 - Click
 to grab a single image and attempt to display it on screen even there was an error.
 - Click
 to continuously grab images and display them on screen.
 - Click
 to continuously grab images and attempt to display them on screen even if there were errors.
 - Click
 to open the camera Feature Browser.
You can configure the camera in the Camera Configuration tab of the the DCF configuration window.
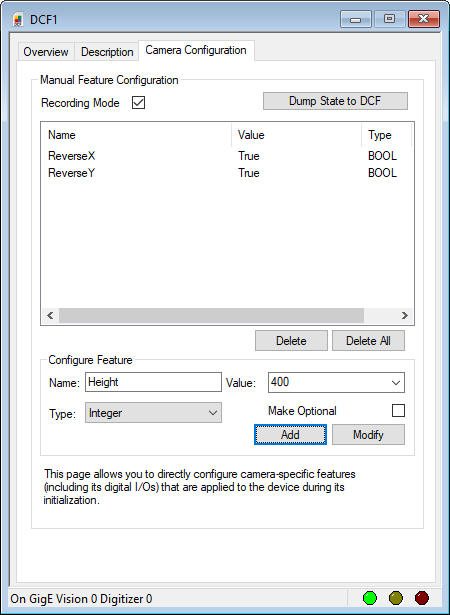
The Manual Feature Configuration section is for camera feature changes made in the Feature Browser.
- Recording Mode enables any changes made in the Feature Browser to be recorded and saved in the DCF.
- Dump State to DCF saves all Streamable camera features in the DCF.
- Delete removes a feature from the DCF.
- Delete All removes all features from the DCF.
The Configure Feature section is for camera features to add to the DCF.
- Name specifies the camera feature’s name.
- Value specifies the camera feature’s value.
- Type specifies the camera feature’s type.
- Add adds a camera feature to the DCF.
- Modify modifies the current camera feature in the DCF.
- Make Optional specifies to make the camera feature optional in the DCF.
Matrox Example Launcher
Matrox Example Launcher is an interface to evaluate MIL’s image acquisition samples. Matrox Example Launcher can be launched from the Start Menu.
The following shows the MdigGrab sample.
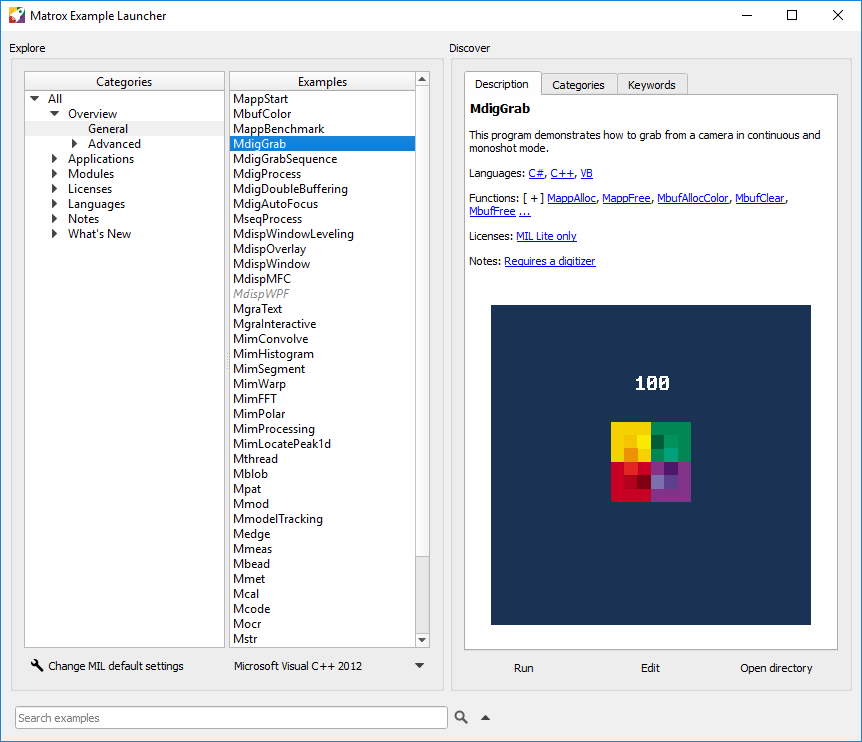
By default, the MIL samples are installed to %PUBLIC%\Documents\Matrox Imaging\MIL\Examples.
For more information on Matrox Imaging Library please visit https://www.matrox.com/imaging/en/products/software/mil/